
Bob Clarke’s MAD Zeppelin: The Assembly Begins
Here are the complete assembly instructions: Part 1, Part 2, Part 3.
Putting the Balloon and Hull Units Together (Figures 1-3)


INTRO
When the 1965 Worst From MAD No. 8 copy arrived in the mail, I went over to the copier machine at work to make copies of Bob Clark’s MAD Zeppelin insert. I didn’t put much thought into how to make copies. Fortunately, Clarke made all the parts one-sided with perforations that could be folded over to make a second side. I quickly realized that I would have to push the spine of the MAD down a bit to get the parts closest to the gutter to lie flat for the copy.
Yikes! This pushing caused some of the die-cut parts to partially come unattached. There goes a possible grade-reducing defect. Even with moderate pushing, the color copies had a perspective”smear” near the gutter at the magazine’s spine. This can easily be seen in the photo showing most of the Zeppelin’s Balloon Unit (Clarke chose to capitalize the word Zeppelin and its smaller parts throughout his instructions). Look at both parts labelled Tab A and you can see the difference.
I wondered if this would cause the MAD Zeppelin assembly to be a bit off. Since the Balloon was Figure 1 of Clarke’s instructions, I hoped it wouldn’t come out too bad. As we shall see, another part caused the biggest headache, and it wasn’t smeared in the gutter.
TOOLS
Tools are minimal. I had an Xacto knife, a pencil, a metal ruler and paper clip (for scoring bendable parts that were perforated in originals), and also glue and tape (not included in Clarke’s instructions). I used a cutting mat since I have one. TIP: Cardboard can be used instead of a mat, but replace often to avoid having the blade slip while cutting. Finally, Clarke wise-cracked that the person making the MAD Zeppelin could cut out the string he drew. I decided to use red string, though I only realized after finishing that blue string matched the “net” over the Balloon Unit.


FIGURES 1 AND 2: THE BALLOON UNIT
Before I cut anything, I studied Clarke’s instructions while referencing the color copies of the parts. Even though I’m an experienced paper cutter due to my stencil making, I realized I was at a disadvantage since the lines of the original’s die cuts weren’t completely showing up in the copies.
Looking at FIGURE 1, I incorrectly assumed that this would be the hardest part of the Zeppelin to assemble. I even took many photographs of the Balloon assembly with the assumption that you all would appreciate the angles, cut lines, and tracing.
First, I traced the outlines for all the parts. I had to reference the inserts in the Worst From (more grading reductions for more use!) and got a few bits wrong. I also had to double check where the inserts had to be cut for some of the tabs to go into (Ex: Tabs E and J). My copies again showed some of these slots and mistakes, but I would also flip the original insert over to the backside to check again. TIP: It may be easier to see the die-cuts and dash-like non-cut (bendable) parts from the backside of the insert pieces.
You can see that I incorrectly dashed lines for the Tab Bs. After more study of the insert, they were cut (you can also see this in Figure 1). However, the Balloon was scored at the white triangle parts near Tab B. TIP: A knife may cut through, so I used a ruler/straight edge and just pushed the curved part of a paperclip down the line to make the bend. NOTE: To make the mark in the place where you want it, simply move your straight edge over a bit so the paper clip will mark your line. Eyeball it before you do it.
Figure 1 looks confusing, but once I got started, the Balloon Unit easily took shape. Clarke’s main TIP is to put the tab inside to make it look more realistic. Took some finesse but I made it work. After these steps, I slipped in some small pieces of tape into the Balloon to keep it together.
TIP: Clarke made little Tabs for the final string-up. Make sure they’re outside the parts they’re on (they also appear on the Deck Unit of the boat).
FIGURE 2 was much more straightforward than I thought it would be. Don’t forget to cut out Slots C and D. Inserting the tips of the balloon into the main piece was easy. Clarke’s skills are quickly shown with the three first parts looking like a realistic, pointed Zeppelin Balloon.

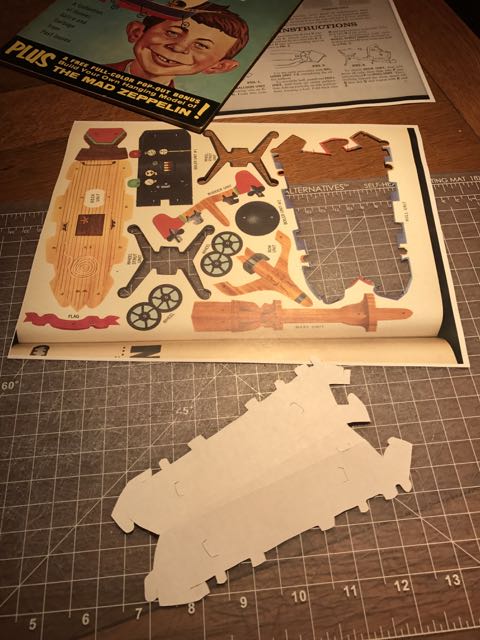


FIGURE 3: HULL AND WHEEL STRUT UNITS
The Hull Unit appears to be a difficult part to cut out, but it wasn’t. Insert O for the struts are easy to see, all the tabs on the edge are easy, and it simply connects with two tabs (M and N). There are two inserts to cut at the stern (V and Z); I missed one before the photos were taken.
The only tricky part to the Hull Unit is the scoring of the folds. There are three that form a triangle shape that meet at one point in the bow of the Hull. They didn’t show up in the copy I made, so I had to refer to the original to get an idea of where the three started. Once start points on the stern were found, it was an easy job with the paper clip and straight edge.
Putting the Wheel Struts into the Hull (FIGURE 3) was an easy part of the assembly. After some tracing, I cut the Struts out, used my paper clip to create and then fold them. I inserted them into the Hull and then glued them. TIP: Probably better to glue before inserting the Struts. The Hull wasn’t that hard to cut and score (see photo to find the 3 score lines). TIP: The P Tabs needed to be cut deeper for FIGURE 4, so maybe cut a bit longer that you think you may need.
So far, so good. Now for the wonky part! (TO BE CONTINUED)
3 Replies to “MAD Zeppelin: The Assembly Begins”
Comments are closed.